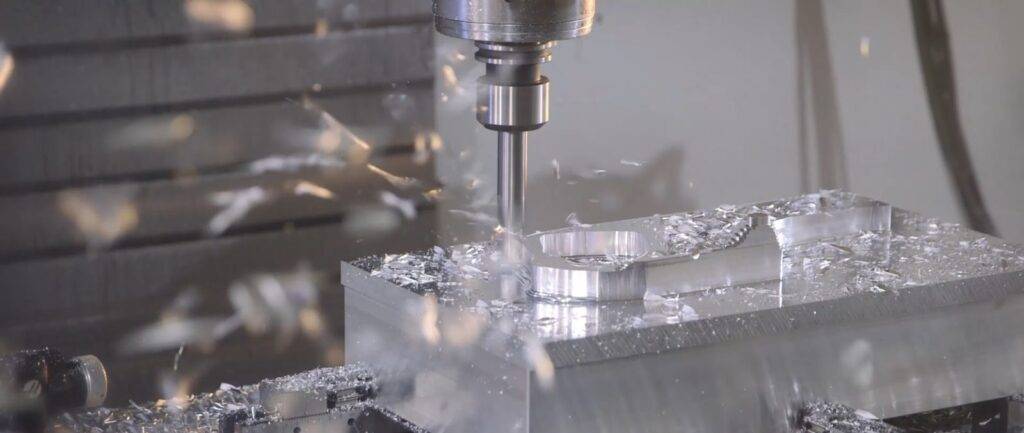
Whether you’re looking to create a single prototype or prepare for large-scale production, reducing manufacturing costs is often a top priority when it comes to CNC machining.
As a designer, your decisions can significantly impact the final pricing. By following the “Design for Machinability” tips in this article, you can create optimized parts that minimize costs while still meeting your design requirements.
What Influences the Cost of CNC Parts?
The price of CNC-machined parts depends on the following factors:
Processing time: The longer it takes to machine a part, the more expensive it is. In CNC, processing time is often the primary cost driver.
Startup costs: These relate to CAD file preparation and process planning and are significant for low-volume production. This cost is fixed, and there are opportunities to reduce the unit price by leveraging economies of scale.
Material costs: The cost of the material and the ease with which it can be machined significantly impact the overall cost. Optimizing the design while considering certain material factors can significantly reduce the price.
Other manufacturing costs: When you design a part with special requirements (for example, when you define tight tolerances or design with thin walls), you may require special tooling, stricter quality control, and more machining steps (at lower machining speeds). Naturally, this has an impact on the total manufacturing time (and price).
Now that we understand the sources of CNC costs, let’s look at how to optimize your design to minimize them.
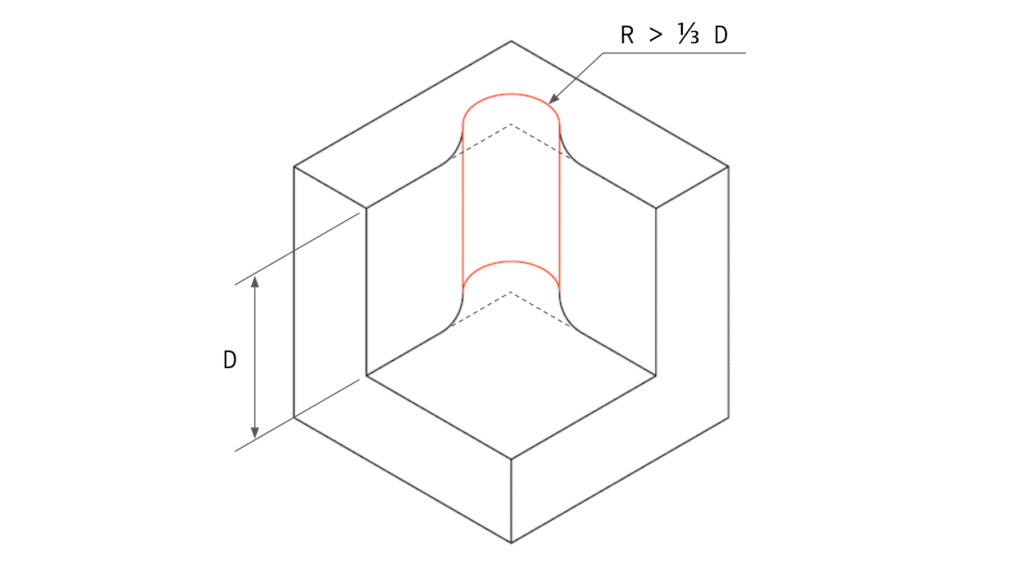
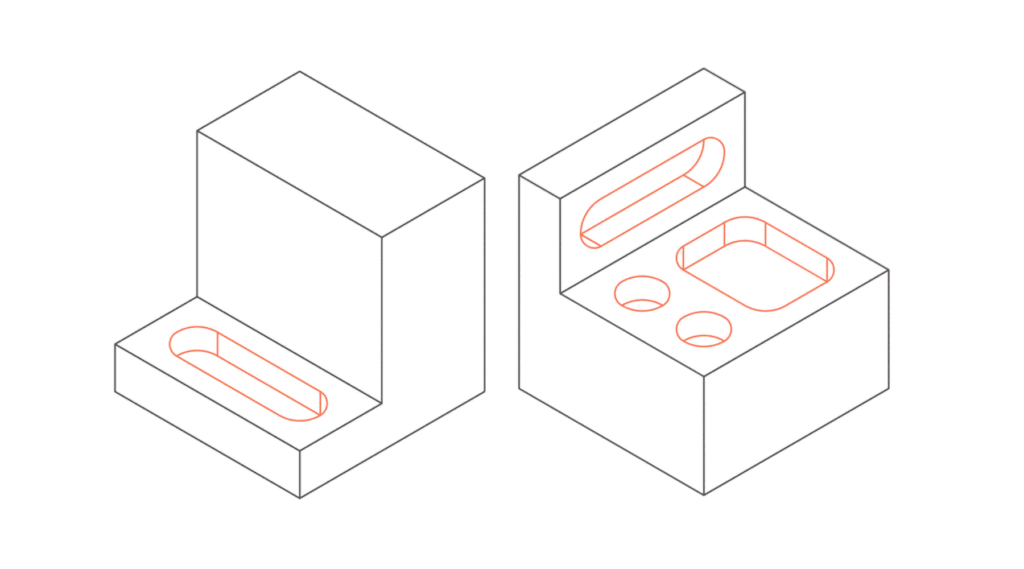
Tip 1: Add a Radius to Internal Vertical Edges
All CNC milling tools have a cylindrical shape and create a radius when cutting the edges of pockets.
Using a smaller diameter tool can reduce the corner radius. This means making multiple passes at a lower speed—smaller tools cannot remove material as quickly as larger tools in a single pass—increasing machining time and cost.
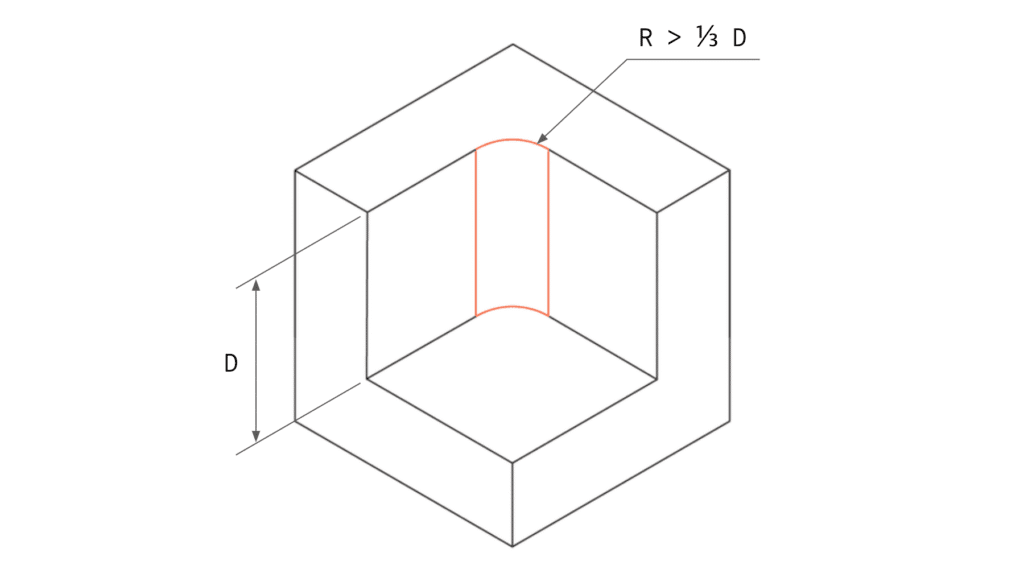
Minimizing Costs:
- Add a radius at least 1/3 of the cavity depth (the larger, the better).
- Ideally, use the same radius for all internal edges.
- At the bottom of the cavity, specify a small radius (0.5 or 1 mm) or no radius at all.
Ideally, the corner radius should be slightly larger than the tool radius used to machine the cavity. This reduces the load on the tool and further lowers manufacturing costs. For example, if your design has a 12 mm-deep cavity, add a 5 mm (or larger) radius at the corners. This allows an ø8 mm tool (radius 4 mm) to cut at a faster rate.
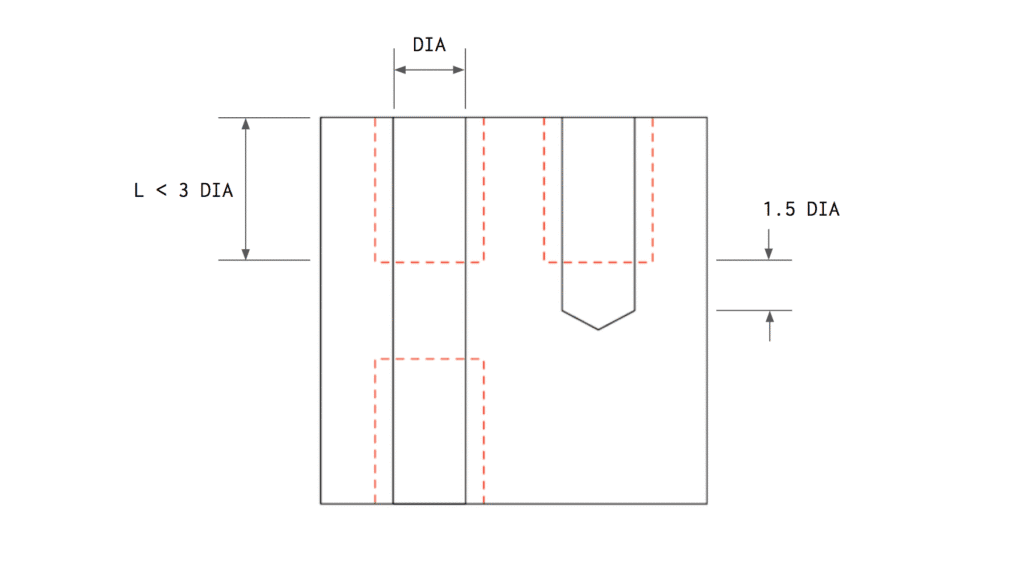
Tip 2: Limit the Depth of the Cavity
If sharp internal corners are required (for example, when a rectangular part needs to fit into a cavity), use a shape with reliefs or notches instead of reducing the internal corner radius, as shown below.
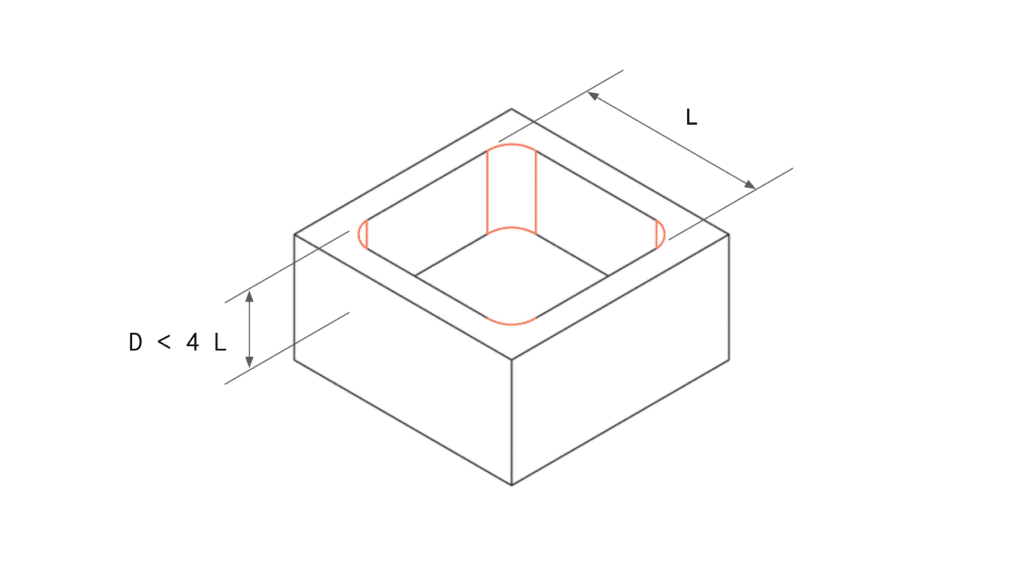
Machining deep cavities can greatly affect the cost of CNC parts, as a large amount of material must be removed, a process that is very time-consuming.
Always keep in mind that CNC tools have a limited cutting length: generally, they perform best when the cutting depth is 2–3 times the tool diameter. For example, a ø12 mm end mill can safely cut cavities up to 25 mm deep.
Deeper cavities (up to 4× the tool diameter or more) can be machined, but this significantly increases cost, as it requires specialized tools or a multi-axis CNC system.
Also, when cutting a cavity, the tool must ramp down to the correct depth, requiring enough space for a smooth entry.
Minimize Costs:
- Limit the depth of all cavities to no more than 4× their length (the maximum XY dimension).
Tip 3: Increase the Thickness of Thin Walls
Unless weight is a major factor, thicker, solid sections are more stable (and cheaper to machine) and should be preferred.
To avoid deformation or breakage during machining, thin walls require multiple shallow cutting passes. Thin features also vibrate easily, making precision machining difficult and time-consuming.
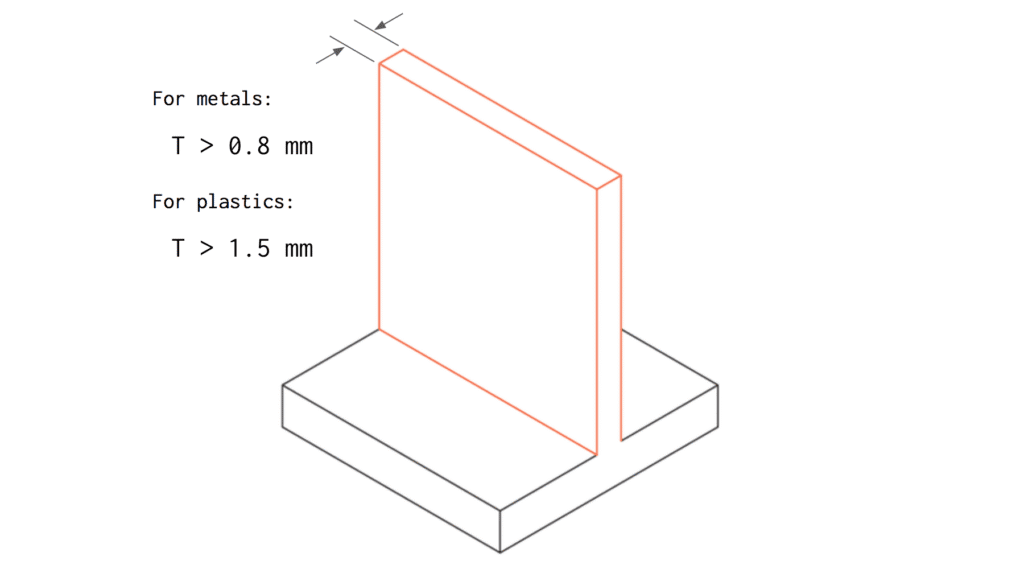
Minimize Costs:
- For metal parts, design wall thickness greater than 0.8 mm (the thicker, the better).
- For plastic parts, maintain a minimum wall thickness of 1.5 mm.
The minimum achievable wall thickness is 0.5 mm for metals and 1.0 mm for plastics, but machinability must be assessed case by case.
Tip 4: Limit Thread Length
Specifying longer threads than necessary can increase part cost because special tools may be required.
Remember: Threads longer than 1.5× the hole diameter do not significantly improve joint strength.
Minimize Costs:
- Design threads with a maximum length of 3× the hole diameter.
- For blind holes, include at least ½ the diameter of unthreaded depth at the bottom.
Tip 5: Design Holes to Standard Sizes
Holes can be quickly and accurately machined using standard drill sizes. Non-standard holes must be milled with an end mill, which increases costs.
Also, limit hole depth to 4× the diameter. Deeper holes (up to 10×) can be made but at a higher cost due to machining difficulty.
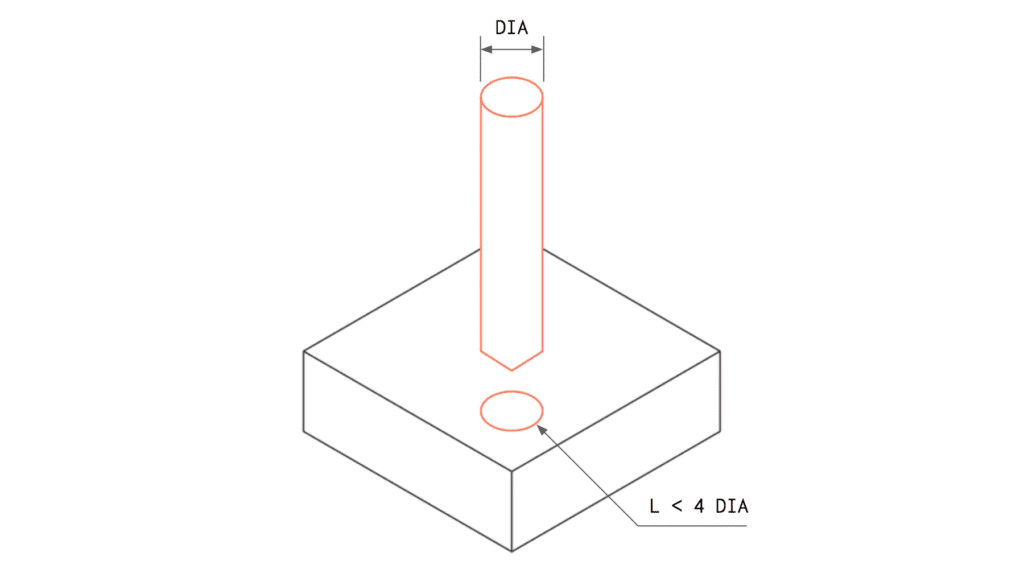
Minimize Costs:
- For holes between 0.5 mm and 10 mm, design diameters in 0.1 mm increments.
- When designing in inches, use fractional drill sizes (refer to a fractional drill size chart).
- Design hole depths up to 4× the diameter.
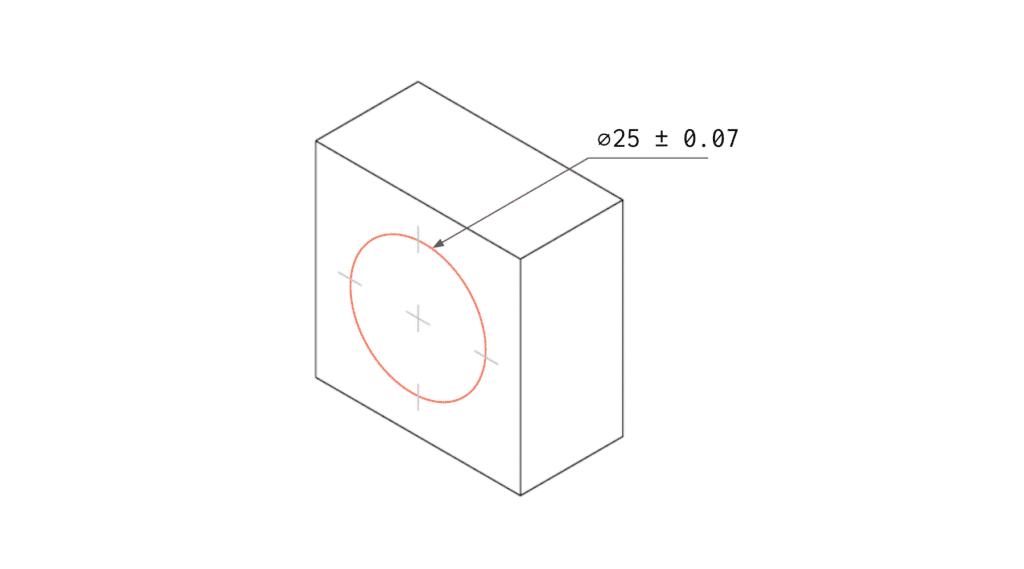
Tip 6: Define Tight Tolerances Only When Necessary
Tight tolerances increase CNC costs because they extend machining time and require manual inspection. Define them only where functionally critical.
If no specific tolerance is defined on technical drawings, standard tolerances (±0.125 mm or higher) are applied—sufficient for most non-critical features.
Tight tolerances are especially hard to maintain for internal features. For instance, cross holes or cavities may develop small burrs from material deformation. Parts with such features require manual inspection and deburring, both time-consuming and costly.
Minimize Costs:
- Specify tight tolerances only where essential.
- Define a single datum (e.g., intersection of two edges) as the reference for all tolerance dimensions.
Using GD&T (Geometric Dimensioning and Tolerancing) symbols (flatness, straightness, roundness, true position) on drawings can reduce machining cost, as they typically define looser acceptable limits—but they require advanced design understanding.
Tip 7: Minimize the Number of Machine Setups
Each time a part must be rotated or repositioned, cost increases—these steps are usually manual. Complex geometries may require custom fixtures or multi-axis CNC systems, both raising costs.
Consider splitting complex parts into simpler geometries that can each be machined in a single setup, then assembled with bolts or welding. This is especially useful for parts with deep cavities.
Minimize Costs:
- Design parts that can be machined in one setup.
- If not possible, split the geometry into multiple components for later assembly.
Tip 8: Avoid Small Features with High Aspect Ratios
Small features with high height-to-width ratios are prone to vibration, making them difficult to machine accurately.
To increase stiffness, connect them to thicker walls or reinforce them with supporting ribs (preferably four—one per side).
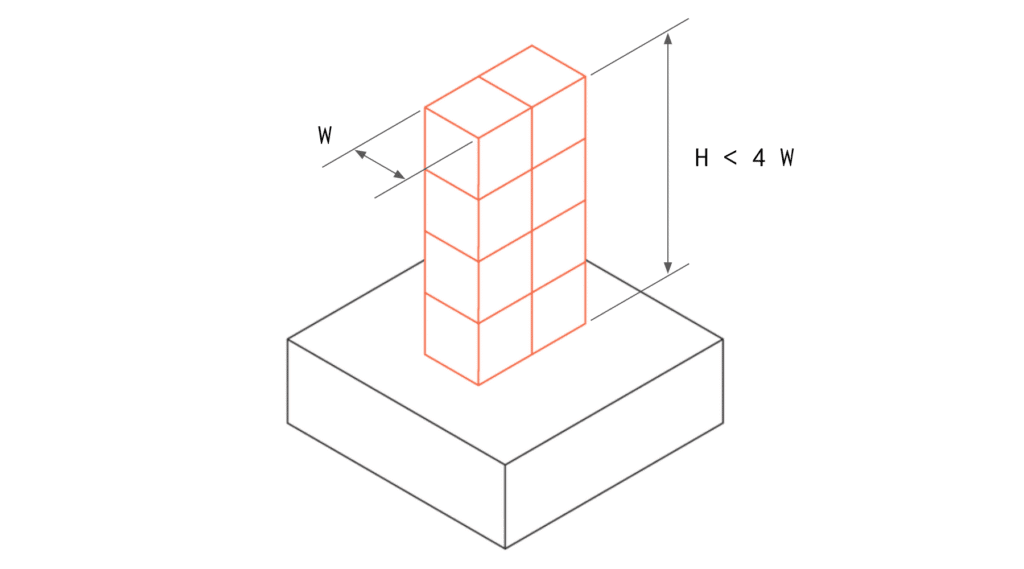
Minimize Costs:
- Design features with an aspect ratio below 4:1.
- Add supports or connect small features to walls to increase stiffness.
Tip 9: Remove All Text and Engravings
Adding text to CNC-machined surfaces significantly increases cost due to extra machining time.
Surface finishing methods like screen printing or painting are much more cost-effective for adding text or labels.
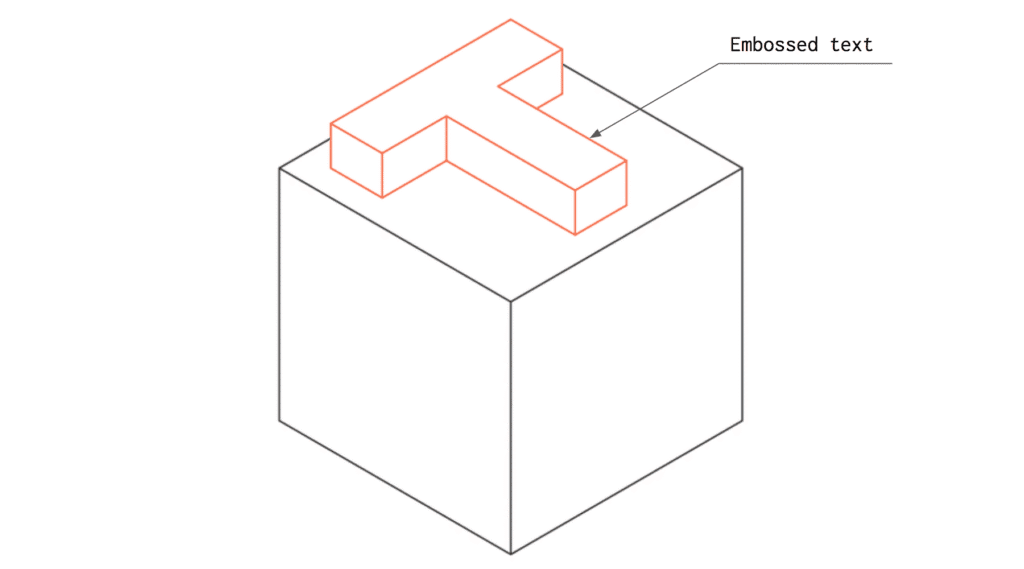
Minimize Costs:
- Remove all engraved or embossed text from CNC parts.
- If text is required, engrave rather than emboss, as engraving removes less material.
Tip 10: Consider Material Machinability
Machinability refers to how easily a material can be cut. The higher the machinability, the faster and cheaper the CNC process.
Machinability depends on a material’s physical properties. Generally, softer and more ductile metal alloys are easier to machine.
Minimize Costs:
- When possible, choose materials with better machinability, especially for large-volume production.
Tip 11: Consider Bulk Material Cost
Material cost strongly affects the total price of CNC parts.
Aluminum 6061 is typically the most cost-effective metal for prototypes—it combines low cost with excellent machinability.
Minimize Costs:
- Choose low-cost bulk materials, especially for small production runs.
Tip 12: Avoid Multiple Surface Finishes
Surface finishes improve both appearance and resistance to harsh environments, but they add cost.
Requesting multiple finishes on the same part further increases costs due to extra processing steps.
Minimize Costs:
- Opt for a machined finish whenever possible.
- Request multiple finishes only when absolutely necessary.
Tip 13: Consider Blank Size
The size of the raw blank affects overall cost. To ensure accuracy, some material must be removed from all sides of the part, impacting material costs—especially for large runs.
As a rule of thumb, the blank should be at least 3 mm larger than the final part on every side.
Minimize Costs:
- Design parts 3 mm smaller than standard blank sizes.
- Refer to common stock size charts or material supplier catalogs for guidance.
Reducing CNC machining costs doesn’t mean sacrificing quality or precision—it’s about designing smart. By applying these 13 design-for-manufacturability tips, engineers can significantly optimize materials, geometry, and tolerances to achieve high-quality results at lower costs.
At YPMFG, our expert CNC machining team understands how thoughtful design can make a big difference. With advanced 3-, 4-, and 5-axis CNC equipment, we help customers transform optimized designs into precise, cost-effective parts.
Contact YPMFG today to discuss your project and see how we can help you reduce manufacturing costs without compromising quality.


