Metal casting parts are essential components across countless industries, from automotive and aerospace to construction and heavy machinery. This guide gives you the practical, actionable knowledge you need to select, specify, and source the right metal casting parts for your application—without wading through promotional fluff or generic theory.
01What Are Metal Casting Parts? (And Why You Need the Right Ones)
Metal casting parts are components formed by pouring molten metal into a mold, then allowing it to solidify into the desired shape. This manufacturing method is one of the oldest and most versatile, capable of producing everything from tiny brackets to multi-ton engine blocks.
The core challenge: A poorly chosen casting process or alloy leads to premature failure, dimensional inaccuracies, and costly production delays. Getting it right from the start saves time, money, and safety risks.
02The Most Common Metal Casting Processes (With Real-World Examples)
Each casting method has distinct strengths and limitations. Here’s what actually works in production:
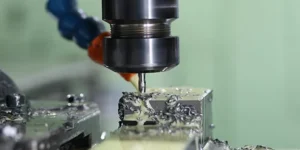
1. Sand Casting – Best for Large, Low-Volume Parts
How it works: A pattern is pressed into sand to form a cavity, then molten metal is poured in.
Typical parts: Engine blocks, pump housings, large gear blanks.
Example: A construction equipment manufacturer needed a 200kg hydraulic valve body. Sand casting allowed them to produce 50 units with low tooling costs ($5,000 vs. $50,000 for die casting).
Tolerances: ±0.5mm to ±1mm (rough, requires secondary machining for precision fits).
2. Die Casting – Best for High-Volume, Small-to-Medium Parts
How it works: Molten metal is injected under high pressure into a steel mold (die).
Typical parts: Automotive transmission cases, handheld tool bodies, electronic enclosures.
Example: A power tool company produced 500,000 trigger housings per year. Die casting gave them 0.1mm repeatability and a smooth surface finish that eliminated secondary polishing.
Tolerances: ±0.05mm to ±0.1mm (excellent).
3. Investment Casting – Best for Complex, Precision Parts
How it works: A wax pattern is coated in ceramic, then melted out to leave a precise cavity.
Typical parts: Turbine blades, surgical instruments, firearm components.
Example: An aerospace supplier required a fuel nozzle with internal cooling passages. Investment casting achieved the geometry in one piece, eliminating welded assemblies that had failed in testing.
Tolerances: ±0.03mm to ±0.1mm (very high precision).
4. Permanent Mold Casting – Best for Medium-Volume, Consistent Parts
How it works: Gravity pours molten metal into a reusable metal mold.
Typical parts: Pistons, wheel rims, pipe fittings.
Example: A pump manufacturer switched from sand casting to permanent mold for 10,000 bronze impellers per year. The change reduced scrap from 12% to 3% and doubled mold life.
Tolerances: ±0.2mm to ±0.5mm.
03Critical Material Selection Guide (Avoid the #1 Mistake)
The most common error is choosing an alloy based solely on strength. In reality, you must balance:
Actionable rule: Always request a material test report (MTR) from your supplier, certified to ASTM or ISO standards. Do not accept “equivalent” grades without full traceability.
04How to Verify Quality: 3 Non-Negotiable Tests
Before accepting any metal casting parts, perform or require these inspections:
1. Dimensional inspection – Use CMM (coordinate measuring machine) or hard gauges on critical features. Sample size: At least 5 parts per cavity for first article inspection (FAI).
2. Non-destructive testing (NDT) –
For safety-critical parts (brake calipers, valve bodies): Require 100% radiographic (X-ray) inspection.
For pressurized components: Hydrostatic testing at 1.5x working pressure.

3. Mechanical validation – Take sacrificial parts from each production lot and test tensile strength and hardness. Reject any lot where results fall below the material standard’s minimum.
Common failure example: A farm equipment buyer accepted 1,000 cast iron brackets without NDT. Six months later, 40% cracked under normal load due to hidden shrinkage porosity. Each failure cost $15,000 in field repairs.
05The 5-Step Process to Source Metal Casting Parts Correctly
Follow this sequence to avoid the delays and quality surprises that plague most buyers:
Step 1: Finalize your part design for castability.
Add draft angles (1–3° for sand casting, 0.5–1° for die casting).
Avoid sharp corners – use radii of at least R1.5mm.
Uniform wall thickness (variation < 25% between thickest and thinnest sections).
Step 2: Define your requirements in a clear RFQ (request for quotation).
Your RFQ must include: 3D CAD file (STEP or IGES), 2D drawing with GD&T (geometric dimensioning and tolerancing),material specification with standard (e.g., ASTM A536), annual quantity and batch size, required certifications (ISO 9001? IATF 16949?).
Step 3: Qualify suppliers using documented evidence.
Request their defect rate over the last 12 months (target: < 2% PPM for die casting, < 5% for sand casting).
Ask for customer references in your industry.
Verify they own their own NDT equipment (X-ray, UT) – third-party inspection adds 5–10 days to every order.
Step 4: Approve samples before production.
Require 5–10 samples per cavity.
Perform your own dimensional check on at least 3 critical features.
Cut and etch one sample to verify internal soundness.
Step 5: Establish an incoming inspection plan.
For high-volume parts (>10,000/year): Use statistical sampling (ANSI/ASQ Z1.4, AQL 1.0).
For low-volume critical parts (e.g., aerospace): Inspect 100% of deliveries.
067 Cost Factors You Must Negotiate (Most Buyers Miss These)
07Repeat Core Principle: Start with the Application, Not the Process
Your goal is a metal casting part that performs reliably over its entire service life. That means you must:
1. Identify the primary failure risk (fatigue? corrosion? wear? impact?)
2. Select the casting process and material that directly mitigates that risk
3. Validate with physical testing – never rely solely on supplier claims
Real-world validation: A mining equipment company replaced sand-cast steel liners with investment-cast chrome white iron liners. The new parts lasted 4x longer despite costing 2.5x more. Total cost per ton of ore processed dropped by 35%.
08Actionable Conclusion: Your Next Steps
Do not treat metal casting parts as commodities. The difference between a successful casting and a field failure comes down to three actions you can take today:
Action 1: Download or create a casting RFQ template that includes all the elements in Step 2 above. Use it for every new supplier.
Action 2: For any existing part that has failed prematurely, perform a root-cause analysis. Check if the failure matches one of the common scenarios described in this guide (porosity, wrong alloy, insufficient draft).
Action 3: Require your current suppliers to provide the three NDT results listed under “How to Verify Quality” on your next purchase order. If they cannot, find a supplier who can.
Remember: The cheapest quote almost always leads to the most expensive failure. Invest your time in specification and verification – that is where 90% of long-term value is created.

