Definition of Hardness
In physics and materials science, hardness refers to a material’s ability to resist localized deformation, particularly indentation or scratching. It is one of the key indicators used to compare the strength of different materials. Because various testing methods exist, different hardness scales are used. These scales are not directly interchangeable, but correlations can be established through experimental comparison.
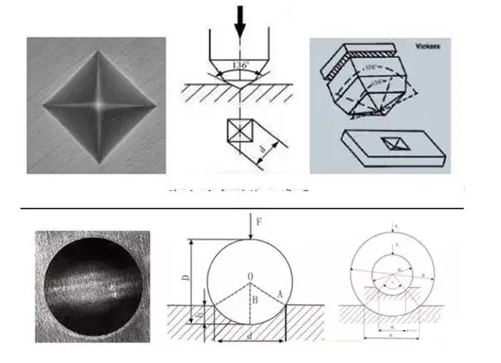
Table of Contents
The chart below illustrates the approximate relationships among tensile strength, Vickers hardness (HV), Brinell hardness (HB), and Rockwell hardness (HRC), based on the German standard DIN 50150.
| Tensile Strength (N/mm2) | Vickers Hardness HV | Brinell Hardness HB | Rockwell Hardness HRC |
| 255 | 80 | 76.0 | — |
| 270 | 85 | 80.7 | — |
| 285 | 90 | 85.2 | — |
| 305 | 95 | 90.2 | — |
| 320 | 100 | 95.0 | — |
| 335 | 105 | 99.8 | — |
| 350 | 110 | 105 | — |
| 370 | 115 | 109 | — |
| 380 | 120 | 114 | — |
| 400 | 125 | 119 | — |
| 415 | 130 | 124 | — |
| 430 | 135 | 128 | — |
| 450 | 140 | 133 | — |
| 465 | 145 | 138 | — |
| 480 | 150 | 143 | — |
| 490 | 155 | 147 | — |
| 510 | 160 | 152 | — |
| 530 | 165 | 156 | — |
| 545 | 170 | 162 | — |
| 560 | 175 | 166 | — |
| 575 | 180 | 171 | — |
| 595 | 185 | 176 | — |
| 610 | 190 | 181 | — |
| 625 | 195 | 185 | — |
| 640 | 200 | 190 | — |
| 660 | 205 | 195 | — |
| 675 | 210 | 199 | — |
| 690 | 215 | 204 | — |
| 705 | 220 | 209 | — |
| 720 | 225 | 214 | — |
| 740 | 230 | 219 | — |
| 755 | 235 | 223 | — |
| 770 | 240 | 228 | 20.3 |
| 785 | 245 | 233 | 21.3 |
| 800 | 250 | 238 | 22.2 |
| 820 | 255 | 242 | 23.1 |
| 835 | 260 | 247 | 24.0 |
| 850 | 265 | 252 | 24.8 |
| 865 | 270 | 257 | 25.6 |
| 880 | 275 | 261 | 26.4 |
| 900 | 280 | 266 | 27.1 |
| 915 | 285 | 271 | 27.8 |
| 930 | 290 | 276 | 28.5 |
| 950 | 295 | 280 | 29.2 |
| 965 | 300 | 285 | 29.8 |
| 995 | 310 | 295 | 31.0 |
| 1030 | 320 | 304 | 32.2 |
| 1060 | 330 | 314 | 33.3 |
| 1095 | 340 | 323 | 34.4 |
| 1125 | 350 | 333 | 35.5 |
| 1115 | 360 | 342 | 36.6 |
| 1190 | 370 | 352 | 37.7 |
| 1220 | 380 | 361 | 38.8 |
| 1255 | 390 | 371 | 39.8 |
| 1290 | 400 | 380 | 40.8 |
| 1320 | 410 | 390 | 41.8 |
| 1350 | 420 | 399 | 42.7 |
| 1385 | 430 | 409 | 43.6 |
| 1420 | 440 | 418 | 44.5 |
| 1455 | 450 | 428 | 45.3 |
| 1485 | 460 | 437 | 46.1 |
| 1520 | 470 | 447 | 46.9 |
| 1555 | 480 | (456) | 47.7 |
| 1595 | 490 | (466) | 48.4 |
| 1630 | 500 | (475) | 49.1 |
| 1665 | 510 | (485) | 49.8 |
| 1700 | 520 | (494) | 50.5 |
| 1740 | 530 | (504) | 51.1 |
| 1775 | 540 | (513) | 51.7 |
| 1810 | 550 | (523) | 52.3 |
| 1845 | 560 | (532) | 53.0 |
| 1880 | 570 | (542) | 53.6 |
| 1920 | 580 | (551) | 54.1 |
| 1955 | 590 | (561) | 54.7 |
| 1995 | 600 | (570) | 55.2 |
| 2030 | 610 | (580) | 55.7 |
| 2070 | 620 | (589) | 56.3 |
| 2105 | 630 | (599) | 56.8 |
| 2145 | 640 | (608) | 57.3 |
| 2180 | 650 | (618) | 57.8 |
| 660 | 58.3 | ||
| 670 | 58.8 | ||
| 680 | 59.2 | ||
| 690 | 59.7 | ||
| 700 | 60.1 | ||
| 720 | 61.0 | ||
| 740 | 61.8 | ||
| 760 | 62.5 | ||
| 780 | 63.3 | ||
| 800 | 64.0 | ||
| 820 | 64.7 | ||
| 840 | 65.3 | ||
| 860 | 65.9 | ||
| 880 | 66.4 | ||
| 900 | 67.0 | ||
| 920 | 67.5 | ||
| 940 | 68.0 |
Types of Hardness Testing
Hardness can be categorized into three categories based on testing methods:
① Scratch hardness
This method is primarily used to compare the hardness of different minerals. A rod with one hard end and one soft end is used to scratch the material being tested along the rod. The location of the scratch determines the hardness of the material being tested. Qualitatively, scratches made by hard objects are longer, while scratches made by soft objects are shorter.
② Indentation hardness
This method is primarily used for metals. A specified indenter is pressed into the material under test with a certain load. The extent of localized plastic deformation on the surface of the material is used to compare the hardness of the material under test. Due to differences in the indenter, load, and duration of the load, various indentation hardness types exist, primarily Brinell hardness, Rockwell hardness, Vickers hardness, and microhardness.
③ Rebound hardness
This method is primarily used for metals. A specially designed small hammer is dropped freely from a certain height to impact the test specimen. The amount of strain energy stored (and subsequently released) in the specimen during the impact (measured by the hammer’s rebound height) is used to determine the material’s hardness.
The most common Brinell hardness, Rockwell hardness and Vickers hardness of metal materials belong to indentation hardness. The hardness value indicates the ability of the material surface to resist plastic deformation caused by another object pressing into it. The rebound method (Shore and Leeb) measures hardness. The hardness value represents the magnitude of the metal’s elastic deformation function.
Common Hardness Scales for Metals
Brinell Hardness
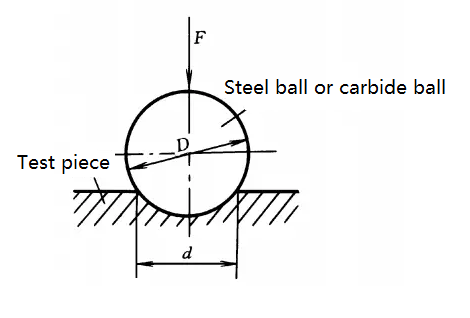
A hardened steel or carbide ball of diameter D is used as an indenter. The indenter is pressed into the specimen surface with a specified test force, F. After a specified hold time, the test force is removed, resulting in an indentation with a diameter of d. The Brinell hardness value is obtained by dividing the test force by the surface area of the indentation. The symbol HBS or HBW is used to represent the Brinell hardness.
The difference between HBS and HBW lies in the indenter. HBS indicates a hardened steel ball indenter and is used to measure Brinell hardness values below 450, such as mild steel, gray cast iron, and non-ferrous metals. HBW indicates a carbide indenter and is used to measure Brinell hardness values below 650.
For the same specimen, when all other test conditions are identical, the two test results can differ. The HBW value is often greater than the HBS value, and there is no quantitative pattern to this difference.
The Brinell hardness test is suitable for cast iron, non-ferrous alloys, and various annealed and tempered steels. It is not suitable for testing specimens or workpieces that are too hard, too small, too thin, or whose surfaces cannot tolerate large indentations.
Rockwell Hardness
A diamond cone with a 120° apex angle or a 1.588mm or 3.176mm hardened steel ball is used as the indenter and load. An initial load of 10 kgf is applied, followed by a total load of 60, 100, or 150 kgf (initial load plus main load). After the total load is applied, the hardness is expressed as the difference between the penetration depth (when the main load is removed but the main load remains) and the penetration depth under the initial load.
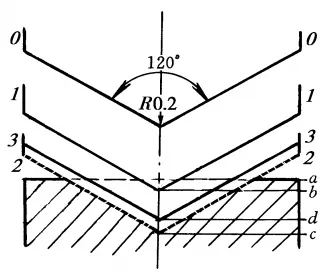
The Rockwell hardness test uses three test forces and three indenters, resulting in nine combinations corresponding to the nine Rockwell hardness scales. These nine scales cover nearly all commonly used metal materials. The most commonly used are HRA, HRB, and HRC, with HRC being the most widely used.
Commonly used Rockwell hardness test specification table
| Hardness Symbol | Indenter type | Total Test Force F/N(kgf) | Hardness Range | Application Examples |
| HRA | 120° Diamond Cone | 588.4(60) | 20~88 | Cemented carbide, carbide, shallow surface hardened steel, etc. |
| HRB | Ø1.588mm Hardened Steel Balls | 980.7(100) | 20~100 | Annealed, normalized steel, aluminum alloys, copper alloys, cast iron |
| HRC | 120° Diamond Cone | 1471(150) | 20~70 | Quenched steel, quenched and tempered steel, deep case hardened steel |
The HRC scale has a range of 20 to 70 HRC. When the hardness value is less than 20 HRC, the sensitivity decreases due to excessive penetration of the conical portion of the indenter. In this case, the HRB scale should be used instead. When the specimen hardness exceeds 67 HRC, the indenter tip experiences excessive pressure, which can damage the diamond and significantly shorten the indenter life. Therefore, the HRA scale should generally be used instead.
The Rockwell hardness test is simple, quick, and produces a small indentation, making it suitable for testing finished surfaces and hard, thin workpieces. However, due to the small indentation, the hardness value fluctuates significantly for materials with uneven microstructure and hardness, making it less accurate than the Brinell hardness test. The Rockwell hardness test is used to measure the hardness of steel, non-ferrous metals, cemented carbide, and other materials.
Vickers Hardness
The Vickers hardness measurement principle is similar to that of the Brinell hardness test. A diamond square pyramid indenter with a 136° angle between its opposing faces is pressed into the material’s surface with a specified test force, F. The force is maintained for a specified time, then removed. The hardness value is expressed as the average pressure per unit surface area of the square pyramid indenter, designated HV.
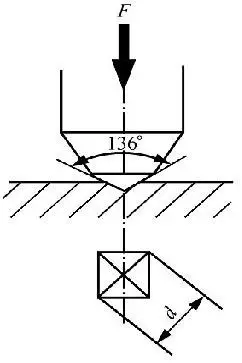
The Vickers hardness measurement range is wide, capable of measuring materials with hardnesses ranging from 10 to 1000 HV. Its small indentation makes it generally suitable for measuring thinner materials and surface hardening layers such as those caused by carburization and nitriding.
Leeb Hardness
A tungsten carbide ball of a certain mass is used to impact the surface of a test piece with a certain force, causing the object to rebound. The rebound velocity varies depending on the hardness of the material. A permanent magnet is mounted on the impact device. As the impactor moves up and down, a coil surrounding it generates an electromagnetic signal proportional to the velocity. This signal is then converted electronically into a Leeb hardness value, symbolized as HL.
The Leeb hardness tester does not require a workbench. Its hardness sensor is as small as a pen and can be operated directly by hand, making it easy to test large, heavy workpieces or those with complex geometries.
Another advantage of the Leeb hardness test is that it minimally damages the surface of the product, making it suitable for non-destructive testing. It is also unique in its ability to test hardness in all directions, in confined spaces, and on specialized locations.
Conclusion
Hardness testing is essential for evaluating the performance and durability of metal materials. Each method-Brinell, Rockwell, Vickers, and Leeb—offers unique advantages depending on the application, material type, and testing conditions.
At YPMFG, we not only understand material properties but also apply this knowledge to deliver precision machining services. With advanced CNC machining, milling, and turning capabilities, we manufacture parts that meet strict hardness, strength, and surface finish requirements. Whether you need prototypes or large-scale production, our team ensures consistent quality, competitive pricing, and on-time delivery.
Contact YPMFG today to discuss your project needs and discover how our machining expertise can support your business.


