Table of Contents
I. General Principles for Toolpaths
1. Roughing
Under maximum machine load, the largest possible tool, maximum feed rate, and fastest feed speed should be selected in most cases. With a given tool, feed speed is inversely proportional to feed rate. Generally, machine load is not a limiting factor, tool selection primarily depends on whether the product’s two-dimensional angles and three-dimensional arcs are excessively small. After selecting the tool, determine its length. The principle is that the tool length must exceed the machining depth. For large workpieces, consider whether the tool holder causes interference.
2. Finishing
The purpose of finishing is to achieve the required surface finish and leave an appropriate allowance. Similarly, select the largest possible tool and aim for the fastest possible time, as finishing requires extended duration. Use the most appropriate cutting depth and feed rate. Under the same feed rate, a larger cross-feed rate is faster. The feed amount for curved surfaces correlates with the post-machining finish quality, while the feed rate depends on the external shape of the surface. Within the constraints of not damaging the surface, use the smallest possible allowance, the largest tool, the highest possible spindle speed, and an appropriate feed rate.
II. Clamping Methods
1. All clamping should prioritize horizontal over vertical dimensions.
2. Vise Clamping: The clamping height must not be less than 10 mm. When machining workpieces, clearly specify both the clamping height and machining height. The machining height should be approximately 5 mm above the vise surface to ensure stability while preventing damage to the vise. This is a general clamping method, the clamping height also depends on the workpiece size—larger workpieces require correspondingly greater clamping height.
3. Clamping with Clamping Plates: Clamping plates are secured to the workbench with clamping screws, and the workpiece is fastened to the plates with bolts. This method is suitable for workpieces requiring insufficient clamping height or high machining forces, and generally works well for medium to large workpieces.
4. Support Block Clamping: When the workpiece is large, clamping height is insufficient, and bottom screw fastening is prohibited, support blocks are used. This method requires secondary clamping: first secure the four corners, machine other sections, then secure the four sides and machine the corners. During secondary clamping, prevent workpiece movement by securing before releasing. Alternatively, secure two sides first, then machine the other two.
5. Tool clamping: For tools over 10mm diameter, clamping length must be no less than 30mm, for tools under 10mm diameter, clamping length must be no less than 20mm. Tools must be securely clamped to prevent collisions and direct insertion into the workpiece.
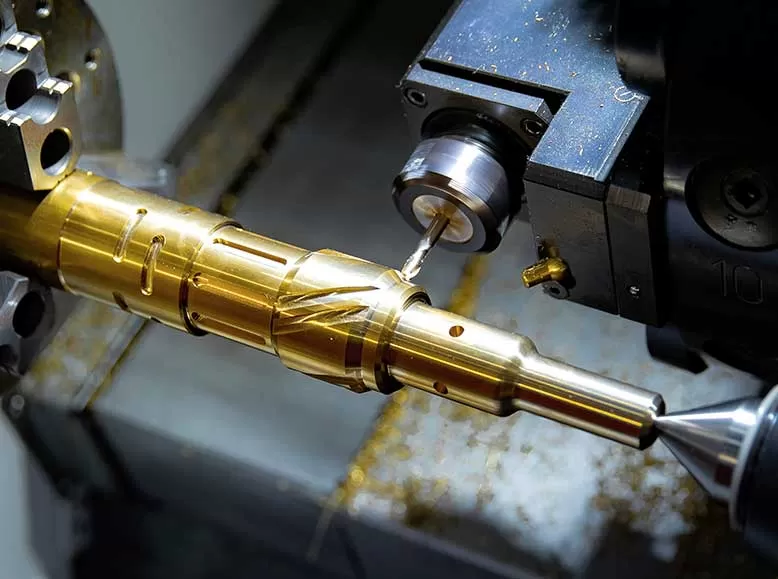
III. Classification of Cutting Tools and Their Applications
1. By Material
High-Carbon Steel Tools: Prone to wear, used for roughing copper molds and small steel materials.
Tungsten Steel Tools: Used for corner finishing (especially steel materials) and finishing cuts.
Alloy Tools: Similar to tungsten steel tools.
Purple Tools: Used for high-speed cutting, resistant to wear.
2. By Cutting Edge
Flat-bottomed tools: Used for flat surfaces and straight side walls, clearing flat corners.
Ball-nose tools: Used for finishing and final smoothing on various curved surfaces.
Bullnose tools (single-sided, double-sided, and five-sided): Used for roughing steel materials (R0.8, R0.3, R0.5, R0.4).
Roughing end mills: Used for roughing operations. Note the required stock allowance (0.3).
3. By Shank Type
Straight shank end mills: Suitable for various applications.
Angled shank end mills: Not suitable for straight surfaces or surfaces with angles smaller than the shank’s angle.
4. By Cutting Edge
Double-edge, triple-edge, quadruple-edge. More edges yield better results but require higher power input, adjust spindle speed and feed rate accordingly. More edges extend tool life.
5. Differences Between Ball-nose and Flying Cutters
Ball-nose cutter: Insufficient clearance when concave gauge is smaller than ball gauge, or when flat gauge is smaller than ball radius (fails to clear bottom corners).
Flying cutter: Its advantage is the ability to clear bottom corners. Comparison with identical parameters: V = R*ω (rotational speed is significantly higher for flying cutters), and the material polished is brighter due to greater force. Flying cutters are more commonly used for contouring profiles at constant height, and sometimes no intermediate polishing is required. The disadvantage is that polishing is not possible when the concave dimension or flat dimension is smaller than the flying cutter diameter.
IV. CNC Combined with EDM: Copper Electrode Manufacturing
1. When Copper Electrodes Are Required
1) When the tool cannot fully penetrate, a copper electrode is needed. If penetration is still impossible within the electrode, further division is required due to protruding shapes.
2) When penetration is possible but tool breakage is likely, a copper electrode is also needed. This depends on actual conditions.
3) Products requiring spark-textured finishes require copper electrodes.
4) When copper electrodes cannot be fabricated due to excessively thin or tall core sections, which are prone to damage and deformation (both during machining and sparking), inserts must be used.
5) Parts machined from copper electrodes exhibit exceptionally smooth and uniform surfaces (especially on curved surfaces), overcoming many issues encountered in precision milling and drafting.
6) Rough copper electrodes must be used when precise external shapes or substantial allowances are required.
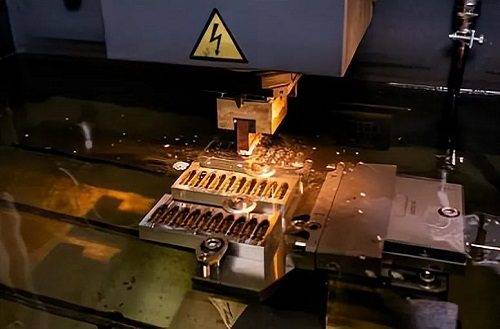
2. Copper Electrode Construction Method
Identify surfaces requiring electrode formation. Complete any missing surfaces or extend existing ones to ensure all electrode edges exceed the target cutting edges without damaging adjacent product surfaces. Remove unnecessary, unreachable flat corners (intersections with flat corners form deeper adhesive pockets) and reshape into regular forms. Determine the maximum electrode outline by defining a boundary and projecting it onto the support surface. Determine the reference frame dimensions, trim the support surface, completing the basic copper electrode drawing. Material preparation: Length × Width × Height. Length and width must be ≥ Ymax and Xmax of the reference frame. Actual copper material dimensions must exceed the drawn reference frame. Height must be ≥ theoretical copper electrode dimension + reference frame height + clamping height.
V. Drawing Dimensioning Issues
1. Without existing machined surfaces: Center all four sides, align center to origin, set top face to zero. For uneven top surfaces (on copper electrodes), allow 0.1mm allowance. During collision checking, actual zero (Z) is reached, while drawing shows 0.1mm lower.
2. When machined surfaces exist: – Align the existing surface to zero (Z). – Center the plane if possible, otherwise, use the existing edge for single-side touch probe. – For machined surfaces, verify actual height, width, and length against drawing dimensions. Program based on actual material. – Generally, machine to drawing dimensions first, then to drawing shape.
3. For multi-position machining, the first position (standard position) must establish reference surfaces for all subsequent positions. Mill all reference surfaces (length, width, height) to ensure all future machining references align with previously machined surfaces.
4. Insert positioning: Place the insert within the workpiece body. Elevate it to a specific height and raise the drawing accordingly. Center the plane relative to the workpiece body, and center the height using screws below the drawing. For square inserts, center directly. For rough positioning, center using the maximum outer contour. Create a fixture, center relative to the fixture, determine the relative position between the insert drawing and the fixture, then set the drawing origin at the fixture’s center point.
VI. Roughing Toolpath Selection
1. Surface Grooving
1) Key considerations: range selection and surface selection
The machining area for the toolpath is defined by: using the selected surfaces within the chosen range as termination surfaces, and covering all areas accessible to the tool from the highest point to the lowest point. The selected surface should ideally cover the entire area, while boundaries should only encompass the region requiring machining. Extensions into non-surfaced areas should be less than half the tool diameter, as other surfaces provide sufficient margin for automatic protection. Extensions should ideally reach the lowest contour line, as the lowest point may be inaccessible to R-cutting.
2) Tool Selection: If the tool cannot perform helical or oblique feed, or if inaccessible areas cannot be machined, seal these regions for secondary roughing.
3) Before finishing, ensure all unroughened areas are fully roughened—especially small corners (including 2D/3D corners and sealed regions)—to prevent tool breakage. Secondary roughing: Typically use 3D slot milling for selection. Employ flat-bottomed cutters, use planar slot milling or contour toolpaths where feasible. Position the tool center to the selected boundary without damaging adjacent surfaces. Generally avoid fine-tuning boundaries. Use rapid bidirectional angling as needed. For helical entry, set angle to 1.5 degrees and height to 1. For linear slot shapes where helical entry is impossible, use diagonal entry. Enable filtering, especially for surface roughing. Ensure entry planes are sufficiently high to prevent collisions, maintain adequate safety clearance.
4) Retraction: Generally use absolute retraction instead of relative retraction. Use relative retraction only when no islands exist.
2. Plane Grooving
Mill various planes and recessed grooves. When milling partially open planes, define boundaries ensuring sufficient infeed (greater than one tool diameter). Extend outward beyond the open area by more than half a tool diameter and enclose the perimeter.
3. Outline
When the selected plane is suitable for outline layering, use layered lifting (plane outline). If the lift point coincides with the entry point, no lifting is required. For Z-plane lifting, use standard lifting whenever possible and avoid relative height. Correction direction is typically right correction (with the tool).
4. Mechanical Compensation Toolpath Settings
Set compensation code to 21, switching from computer compensation to mechanical compensation. Use vertical feed for entry. For areas inaccessible to the tool, increase the R radius without leaving material allowance.
5. Contouring at Constant Height
Suitable for closed surfaces. For open surfaces:
– If four-sided, close the top surface.
– If within four sides or non-four-sided, select range and height (always rough with curved entry).
Roughing application:
– Processing distance within any plane < one tool diameter.
– If > one tool diameter, use larger tool or perform two contouring passes.
6. Surface Streamline
Offers optimal uniformity and precision, often replacing contouring for finishing operations.
7. Radial Toolpath
Suitable for workpieces with large central holes (rarely used). Precautions: When tool deflection occurs, the tool is dull, the tool is excessively long, or the workpiece is too deep, use a circular path instead of vertical up-and-down movements. For sharp corners within the workpiece, split the adjacent surfaces into two separate toolpaths, do not cross over them. When finishing, extend the edges (using curved toolpaths for entry and exit).
VII. Corner Cleaning
1. Here, corner cleaning refers to clearing two-dimensional dead corners—areas not reached by previous machining steps. If a finishing cutter must access these areas, perform corner cleaning first before finishing. For excessively small or deep corners, use multiple cutters for cleaning, avoid using a small cutter to clean too many areas.
2. Cleaning three-dimensional corners: Create small grooves at three-dimensional corner transitions.
3. Tool breakage is common. Consider factors like using fine tools, excessive tool length, and excessive machining volume (primarily in the Z-axis/depth direction).
4. Toolpaths:
– 2D contouring: Suitable only for clearing small corners (R0.8) and 2D planar corners.
– Parallel toolpaths.
– Contouring at constant height.
– For inaccessible curved surfaces or dead corners, seal the area first to initiate the cut, then clear the corners last. Small notches within large surfaces should generally be sealed first.
VIII. Semi-Finishing
1. Semi-Finishing: Performed on curved steel surfaces and fine-cutting tools.
2. Principle: A process to achieve better results during finishing, as roughing with large cutters leaves significant layer-to-layer allowances.
3. Characteristics: Rapid removal, large cutters or flying cutters are acceptable, high feed rates and wide spacing, surface quality is not a concern. Flat workpieces need not undergo intermediate finishing, workpieces with uniform-height profiles also skip this step. For uniform-height roughing, combine both operations with finer settings—referring to reduced surface allowance and layer spacing. Material hardness is another critical factor: harder materials warrant intermediate finishing. For optimal results, alternate the machining direction between intermediate finishing and roughing to achieve uniformity.
IX. Finishing Toolpath
Finishing must meet assembly requirements for products and molds, demanding meticulous planning. Toolpath and parameter settings vary based on specific needs.
1. Set both initial and final heights to 0.001mm tolerance. No filtering required (smaller parts require tighter tolerances, which affect profile accuracy).
2. Achieve the highest surface finish on the front mold and parting line surfaces. The rear mold may be secondary, while non-interfering and clearance areas can be rougher.
3. Toolpath design is determined by the following factors:
1) Specific geometry (e.g., planes vs. other surfaces), steep faces vs. flat surfaces.
2) Presence of sharp angles between surfaces (separate if sharp).
3) Different requirements for two sections (whether to leave allowance, amount of allowance, differing surface finish requirements).
4) Surface protection during finishing is critical. Protected surfaces must account for machining errors and be safeguarded according to protection requirements. This includes range protection (zero tolerance for errors), height range, plane range, and surface protection.
5) Toolpath extension: When toolpaths approach edges during finishing, use circular retract/approach movements or slightly extend the surface beforehand.
6) Tool lift issues: Tool lifts waste time and should be minimized.
Method 1: Set a lift gap (small gap)
Method 2: Cover the lift area (small gap)
Method 3: Avoid gaps (large gaps)
Method 4: For contouring at constant height, extend to the same height.
7) Tool approach in finishing: The first tool approach must start from outside the workpiece to prevent vibration and damage. Always define a tool approach for all finishing operations.
8) Tool wear: For large workpieces, use multiple tools to finish the same part.

